If you’re craving something indulgent yet easy, juicy yet crispy, and totally satisfying, these Air Fryer Cheeseburger Wraps are about to become your new favorite meal. Combining everything you love about a classic cheeseburger—seasoned beef, melty cheese, pickles, and that perfect toasted bun feel—wrapped in a flour tortilla and crisped up in the air fryer. Yes, it’s real. And yes, it’s ridiculously simple to make.
These wraps are more than just delicious. They’re fast, kid-friendly, totally customizable, and ready in under 30 minutes. Whether you’re feeding picky eaters, prepping lunch for the week, or just trying to clean out the fridge, this recipe has your back. Plus, air frying makes it all less greasy while keeping the flavor full blast. Let’s break down why these wraps are worth every bite.
- Why You’ll Love These Air Fryer Cheeseburger Wraps
- Ingredients You’ll Need
- Tools and Equipment
- How to Make Cheeseburger Wraps in the Air Fryer
- Expert Tips for the Best Flavor and Texture
- Variations to Try
- What to Serve with Cheeseburger Wraps
- How to Store and Reheat Leftovers
- Frequently Asked Questions
- Conclusion
- FAQs Section
Why You’ll Love These Air Fryer Cheeseburger Wraps
A Healthier Fast Food Fix
Let’s be honest—sometimes, we just want a burger. But fast food? It’s greasy, expensive, and let’s not even talk about the mystery ingredients. That’s where these cheeseburger wraps come in.
By making them at home, you control everything—from the quality of the beef to the amount of cheese to the crispness of the tortilla. Plus, air frying significantly cuts down on added oils. Unlike deep frying, which submerges your food in oil, the air fryer gives you that satisfying crunch using just a light butter brush or oil spray.
Not to mention: no drive-thru required. You get all the satisfaction of a cheeseburger with fewer calories, less fat, and more peace of mind.
Perfect for Busy Weeknights
These wraps are fast—like, make-it-after-work-with-no-stress fast. We’re talking 30 minutes from start to finish, including cleanup. You cook the beef in one pan, use tortillas that are microwave-softened, roll them up, and boom—air fry for 5 minutes.
This is the kind of recipe that earns its place on your weekly rotation. Whether you’re dealing with soccer practice, late meetings, or just don’t feel like cooking, this dish delivers big flavor with minimal effort.
Plus, cleanup is a breeze. No greasy frying pans or tons of dishes. Just one pan for the beef and your trusty air fryer basket.
Kid-Approved and Family-Friendly
If you’ve got kids, you know the struggle of trying to feed everyone something they’ll actually eat. These cheeseburger wraps are customizable, which means everyone gets what they want. No pickles for Jimmy? No problem. Extra cheese for Sarah? Easy.
They’re also handheld, which makes them fun to eat—no fork or knife required. Slice them in half and they’re perfect for little hands, lunchboxes, or even game-day snacks.
And let’s not forget the adults. Serve these with a cold drink and your favorite dipping sauce, and you’ve got a grown-up snack that hits the spot every time.
Ingredients You’ll Need
Main Ingredients Breakdown
To get that classic cheeseburger taste, you don’t need anything fancy. Here’s what you’ll need and why each ingredient matters:
-
Ground beef (1 lb): Go for 80/20 for a perfect balance of juiciness and flavor. Leaner beef works too, but it might be a bit drier.
-
Flour tortillas (4 large, 10-inch): Burrito-sized is best. The larger surface area makes them easier to wrap without tearing.
-
American cheese (4 slices): Melts beautifully and gives that classic cheeseburger flavor. Feel free to swap for cheddar or provolone.
Condiments & Toppings
-
Mayonnaise (1 tbsp): Adds richness and helps glue everything together inside the wrap.
-
Ketchup (1 tbsp): Classic burger flavor booster.
-
Pickles (16 slices): Tangy crunch! Just make sure to pat them dry so the wrap doesn’t get soggy.
-
Melted butter (1 tbsp): Brushed on top for a golden, crisp finish after air frying.
Seasonings
-
Salt (½ tsp) & pepper (½ tsp): Basic but essential. Don’t skip!
-
Garlic powder (1 tbsp): Adds that extra savory depth.
Together, these simple ingredients create a juicy, crispy, cheesy masterpiece. And the best part? You probably already have most of them in your kitchen.
Tools and Equipment
Why an Air Fryer is a Game-Changer
If you haven’t jumped on the air fryer train yet, now’s your sign. For this recipe, the air fryer is the MVP. Here’s why:
-
Even crispiness: The hot air circulation crisps up the tortilla without overcooking the inside.
-
Speed: 5 minutes at 380°F is all you need.
-
No flipping required: Unlike stovetop or oven methods, air frying gets the bottom and top golden brown with minimal effort.
Whether you’ve got a drawer-style or basket-style air fryer, both work great. Just make sure the wraps have room to breathe—you don’t want them stacked on top of each other.
Other Essential Kitchen Tools
-
Large skillet or frying pan: For browning the beef and seasoning it just right.
-
Microwave-safe plate + damp paper towel: This trick softens tortillas in seconds so they’re easy to fold.
-
Tongs or spatula: To handle the wraps when they’re hot.
-
Pastry brush (optional): Perfect for applying melted butter evenly.
Minimal tools. Maximum impact. That’s the beauty of this recipe.
How to Make Cheeseburger Wraps in the Air Fryer
Step-by-Step Cooking Instructions
Here’s how to bring everything together:
-
Brown the beef: Cook your ground beef in a skillet over medium heat with salt, pepper, and garlic powder. Break it up with a spatula and cook until browned and no longer pink. Drain excess fat if needed.
-
Warm your tortillas: Stack the tortillas, cover with a damp paper towel, and microwave for 20–25 seconds to soften.
-
Assemble the wraps:
-
Lay out each tortilla.
-
Spread a light layer of mayo and ketchup.
-
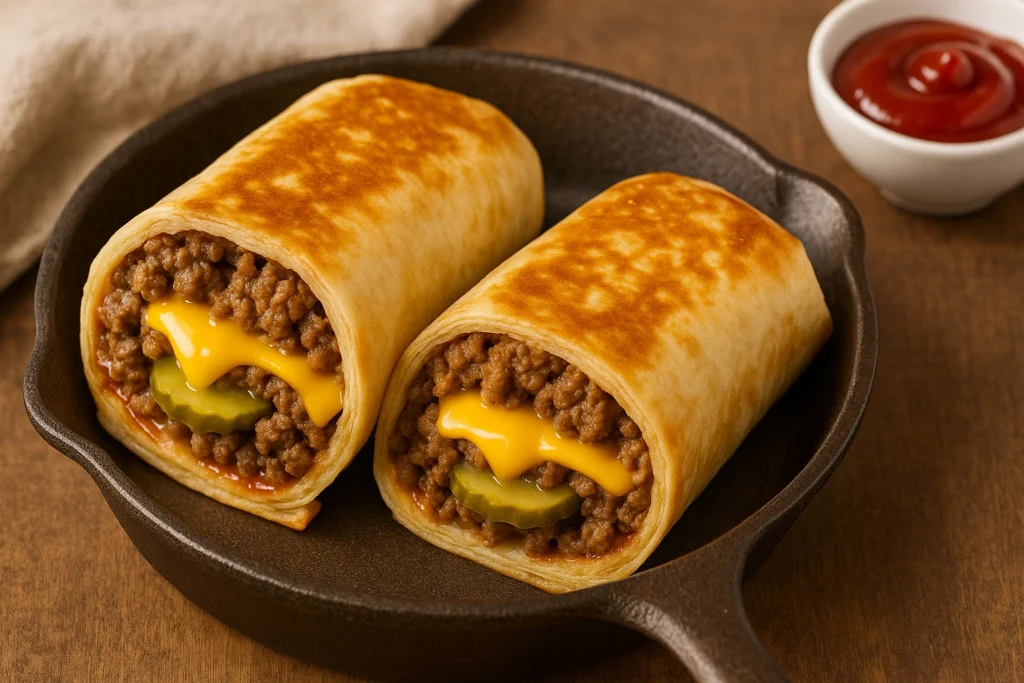
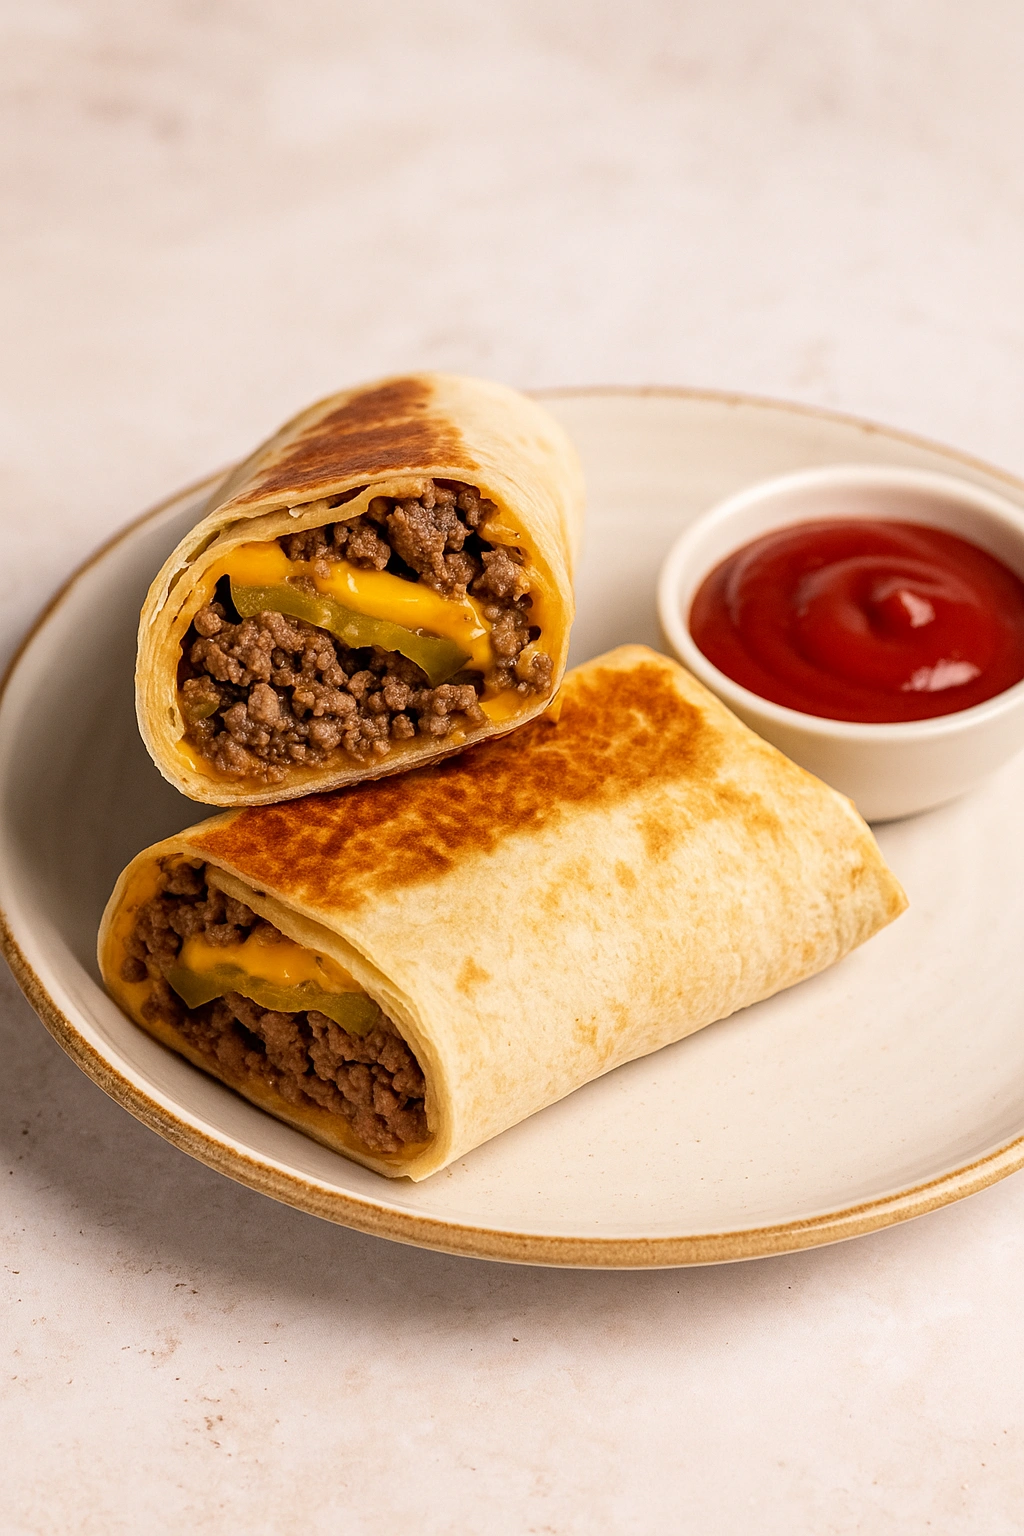
Add 4 pickle slices, 1 cheese slice, and about ½ cup of cooked beef.
-
-
Wrap it up burrito-style: Fold in the sides and then roll tightly. This keeps everything inside during air frying.
-
Brush with butter: Melted butter on top = golden perfection.
-
Air fry: Preheat your air fryer to 380°F. Place wraps seam-side down. Cook for 5 minutes or until golden and crispy. No flipping needed.
-
Cool slightly, slice, and serve!
Wrapping Tips for a Perfect Roll
-
Don’t overfill. It’s tempting, but too much beef or toppings makes rolling tough.
-
Always fold the sides in first. This keeps the fillings from spilling out.
-
Use warm tortillas to avoid tears or cracks—cold ones break easily.
How Long to Air Fry for Maximum Crispiness
Five minutes is usually the sweet spot at 380°F, but this can vary slightly depending on your air fryer model. If your wraps aren’t golden enough, add an extra minute—but keep a close eye!
Expert Tips for the Best Flavor and Texture
Don’t Skip the Butter Brush
This small step makes a massive difference. Brushing the wraps with melted butter before air frying gives them that golden, slightly flaky exterior—like a grilled cheese and a burrito had a delicious baby.
If you want to take things up a notch, try using garlic butter or even a dash of smoked paprika or cayenne in the butter. It adds both color and a kick of extra flavor.
You can also re-brush the wraps with butter after they come out of the air fryer to keep them glossy and rich. Just a light touch goes a long way.
Seasoning Tips You’ll Love
The ground beef is your flavor base—so don’t skimp on seasoning. Garlic powder, salt, and black pepper are essential, but you can customize further:
-
Add a pinch of onion powder for depth.
-
A dash of Worcestershire sauce in the beef while cooking adds richness.
-
Try chili flakes or smoked paprika for a hint of heat.
If you’re making a batch for the family, keep it basic for the kids, then spice up a few wraps for the adults.
And don’t forget: every ingredient you use should be high quality—especially the cheese and pickles. It makes all the difference.
Keeping the Wraps Crispy, Not Soggy
A soggy wrap? No thanks. Here’s how to avoid it:
-
Drain excess fat from the beef after cooking.
-
Shake off pickle juice. Wet pickles = soggy tortilla.
-
Serve immediately. These wraps are best enjoyed fresh out of the air fryer.
Want an extra-crispy shell? Air fry for an additional minute or two—but watch closely so you don’t burn them. Another trick? Add a light sprinkle of panko crumbs inside for some added crunch.
Variations to Try
Cheeseburger Wrap with Bacon
Who doesn’t love bacon? Add two slices of cooked, crispy bacon inside each wrap before rolling. It adds crunch, saltiness, and that unmistakable bacon goodness.
For even more flavor, cook the ground beef in a bit of the bacon fat. It’s not diet food, but it’s definitely delicious.
You can also try bacon bits if you’re short on time. They mix well with the beef and distribute the bacon flavor more evenly.
Low-Carb or Keto-Friendly Version
Trying to cut carbs? Easy fix.
Swap the flour tortillas for low-carb tortillas or even lettuce wraps (think romaine or iceberg for crunch). Skip the ketchup if you’re counting sugar, or use sugar-free versions.
Other keto tweaks:
-
Use full-fat cheese.
-
Add avocado or sautéed mushrooms.
-
Use lean ground turkey or chicken for a lighter base.
This version still satisfies your burger cravings without derailing your goals.
Vegetarian Cheeseburger Wrap Twist
Yes, you can totally make these meat-free!
Try one of these substitutions:
-
Plant-based ground beef like Beyond or Impossible.
-
Black bean burger crumbles with taco seasoning.
-
Chopped grilled mushrooms and onions with cheese.
Add your favorite vegetarian condiments and cheese (or vegan cheese) for a full-flavored wrap that’s just as satisfying.
Even meat-eaters will appreciate how good this version tastes—and you can feel great about adding more veggies to your meal.
What to Serve with Cheeseburger Wraps
Easy Side Dish Ideas
Pairing your wrap with a side dish can turn it into a full-on meal. Here are some tasty, easy options:
-
Air fryer French fries or sweet potato fries
-
Potato wedges or hash browns
-
Classic coleslaw or a tangy vinegar slaw
-
Crispy onion rings
-
Baked beans or corn on the cob
You can also keep it light with a simple salad—romaine, cherry tomatoes, cucumber, and a basic vinaigrette works perfectly.
If you’re hosting friends or feeding a group, serve with a buffet of side options so everyone can pick their favorite.
Best Dips and Sauces
Let’s be real—the dip can make or break a wrap. Here are a few crowd-pleasers:
-
Spicy mayo (mix mayo + Sriracha)
-
Burger sauce (mayo + ketchup + pickle juice + mustard)
-
Ranch dressing
-
Honey mustard
-
BBQ sauce
Don’t be afraid to get creative. A little dip on the side makes every bite more exciting. Serve in ramekins or drizzle inside before wrapping—it’s up to you.
How to Store and Reheat Leftovers
Make-Ahead and Storage Tips
These wraps are best fresh—but if you’re meal-prepping, they can hold up for a couple of days with the right care.
-
Wrap them tightly in foil or plastic wrap.
-
Store in an airtight container in the fridge for up to 3 days.
-
Avoid freezing if they’re already cooked—tortillas get tough and soggy.
For meal prep:
-
Prepare the filling ahead and store separately.
-
Assemble the wraps just before air frying for best texture.
Want to bring them to work or school? Wrap in foil and pack with a small dipping sauce. Reheat just before serving.
Reheating for the Best Texture
Here’s how to get them crispy again:
-
Air fryer: 350°F for 3–4 minutes.
-
Oven: 375°F for 8–10 minutes.
-
Microwave: 1 minute, but note—they won’t stay crispy.
The air fryer is best for restoring that golden crunch. Don’t skip a quick butter brush before reheating for that “just-cooked” flavor.
Frequently Asked Questions
Can I Make These Without an Air Fryer?
Absolutely. If you don’t have an air fryer, you can still make these cheeseburger wraps with a few simple adjustments. Here’s how:
-
Oven method: Preheat your oven to 400°F. Place the wrapped tortillas on a baking sheet lined with parchment paper. Brush the tops with melted butter. Bake for about 10–12 minutes or until golden and crispy, flipping halfway through for even browning.
-
Skillet method: Heat a non-stick skillet over medium heat. Add a small amount of butter or oil and place the wrap seam-side down. Cook for 2–3 minutes on each side until crispy and golden. This method gives a nice crust but requires flipping and watching closely.
While the texture may differ slightly, both methods can yield delicious results without needing an air fryer.
Can I Freeze Cheeseburger Wraps?
Freezing is an option, especially if you’re prepping for a busy week. However, it’s best to freeze these before cooking for optimal results.
To freeze uncooked wraps:
-
Assemble the wraps as usual but do not cook.
-
Wrap each individually in foil or plastic wrap.
-
Store in a freezer-safe bag or container.
-
Label and date them—good for up to 2 months.
To reheat from frozen:
-
Let them thaw in the fridge overnight.
-
Air fry at 380°F for 6–8 minutes or until heated through and golden.
Avoid freezing cooked wraps, as reheated tortillas can become chewy and lose their crispness.
If you do freeze them cooked, use a toaster oven or air fryer to bring back some texture—though it won’t be quite the same as fresh.
Conclusion
Air Fryer Cheeseburger Wraps are the kind of recipe that hits every note—fast, fun, flavorful, and endlessly flexible. Whether you’re cooking for picky eaters, whipping up a quick dinner, or looking for something satisfying that won’t blow your budget, this one checks all the boxes.
You get the juiciness of a cheeseburger, the crunch of a toasted tortilla, and the convenience of a 30-minute meal—all made in your air fryer. With easy customization, make-ahead options, and endless variations, it’s no wonder this recipe is a hit for families, singles, and food lovers everywhere.
So the next time you’re craving a burger but want something a little different, give these wraps a try. They’re so easy, so juicy, and totally addictive. Don’t forget the dipping sauce!
Explore More:
FAQs Section
1. How do I keep the tortillas from tearing?
Warm them in the microwave for 20–25 seconds covered with a damp paper towel. This softens the tortilla and makes it easy to roll without breaking.
2. What’s the best cheese to use?
American cheese melts perfectly and gives that classic burger flavor. But feel free to try cheddar, pepper jack, mozzarella, or provolone based on your preference.
3. Can I make these dairy-free?
Yes! Use dairy-free cheese slices and skip the mayo or swap it with a plant-based alternative. Be sure to check your tortillas—they’re usually dairy-free but double-check the label.
4. How can I spice these up?
Add jalapeños, spicy mustard, hot sauce, or a sprinkle of chili flakes to the beef while cooking. You can also use spicy cheese for an extra kick.
5. Are these good for meal prep?
Definitely. Prepare the filling in advance and assemble wraps when ready to cook. Store everything separately to keep tortillas from getting soggy.